Butter Croissants and Coffee

One of the most best aromas on a beautiful morning

Samosa Chaat

Snack a little

Seekh Kabab

Try something different!

Decadent Chocolate

Do not forget to indulge once in a while

Steamed goodness

Various cooking methods bring variety in your palette

Saturday, July 30, 2011

Penne Pasta with shrimp and chicken sausage

penne
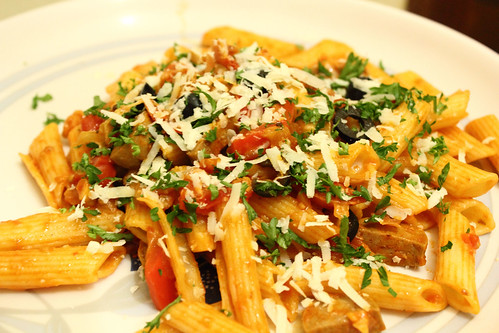
So I was lazing around on Saturday when I was supposed to finish some work. Wasted lots of time watching tv and at around 10.30pm, I started to get the hunger pangs coz the last time I ate something was in the morning. There's so much of chaos outside my house, lots of kids running and shouting about, huge family get togethers happening on a Saturday night. Ignoring the ruckus outside I decided to fix something really fast, and walk into the kitchen to see a huge pile of dishes in the sink and on the countertop. If I had to fix anything, I had to first clear out the dishes. I quickly set myself at the task so that my hunger doesnt start to give me a headache. Almost finished, suddenly we lost power. If it goes late at night, surely its some problem and it should be back soon. I wait it out by watching the latest episode of Desperate Housewives I downloaded. Power comes back after half an hour. I pause the episode, return to the kitchen and finish the remaining dishes. I decided to do a quick one pot meal. No referring recipes, just dumping stuff I had around the kitchen to make one nice hearty meal. I saw a packet of penne pasta and put that onto boil. I check the freezer and got out one last chicken sausage lying in there. Ooh a packet of small shrimps. Thought I'll use em too and get it out to defrost. Checked the refrigerator, found one red capsicum and a packet of cherry tomatoes. I start chopping the vegetables and I lost power again. Grrrrr... I wait it out again, ignoring the hunger pangs again. Resumed my tv episode and it got over too. Just waited silently in the dark, and got it back again in another 10 minutes. I slice an onion, mince some garlic, drained the pasta, put the shrimps to boil (I cant eat it raw like some people do). And yet again, I lose power. God, this is so damn frustrating now!! I switched off the boiling shrimps coz I did not want to overcook it, wait again, and its back after 10 minutes. Thankfully, I managed to prepare the rest of the meal without losing any power. The recipe is explained below. So I plated it nicely to take a picture to post it on the blog. The first one I took is the one you saw above. The dish did look nice and colorful. But I notice that some of the penne is jutting out awkwardly on the sides and maybe I should re-arrange it a bit more to look more elegant. I focus my camera again and click. At that very second I clicked, guess what happened. Look at the shot I got and take a wild guess!! Aaarrggh!!
inthedark

Ingredients:

Penne pasta - 250 grams
Cherry tomatoes - 10 pcs.
Tomato puree - 1/2 cup
Chilli-garlic sauce or any hot sauce - 1 tbsp.
Capsicum - 1/2 or 1 whole
Onion - 1
Garlic - 3 cloves
Chicken sausage - 1 large
Shrimps - 1/4 cup
Parmesan cheese - 1/4 cup, grated
Olive oil - 3 tbsp.
Black Olives - 6 or 7, pitted
Parsley - to garnish
Oregano, Italian seasoning - a pinch

Method:

Boil penne pasta as per instructions on packet, with some salt and oil. Drain and keep aside.
Chop the cherry tomatoes, capsicum, slice onions and mince garlic. Chop the chicken sausage into bite size pieces, grate the parmesan cheese. Wash and clean shrimps and boil it for about 5 minutes and drain. Slice pitted olives and chop parsley.
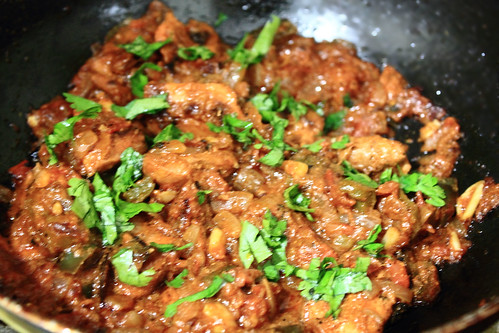
Take a heavy bottomed pan, heat 3 tbsp olive oil, add the minced garlic, sliced onions and capsicum. Cook until soft. Sprinkle the Italian seasoning (I added some garlic bread seasoning I had) and oregano. Add shrimp and sausages and toss to coat with oil. Add chilli-garlic sauce. Add the cherry tomatoes and tomato puree. Toss again. Lower heat, cover the pan, and simmer for about 5 mins. Open and add parmesan cheese (leave some for garnish). Add the pasta little by little, tossing at the same time to coat it with the sauce. Take off the heat. Sprinkle black olives, parsley and parmesan cheese. Serve hot.

Gaajar ka Halwa - Carrot Halwa

gaajarhalwa

I've been making sweets to give away to friends and had repeated the coconut burfi recipe twice over the past 2 weeks. I wanted to try something different this time and chose gaajar ka halwa as I had bought a kilo of carrots last weekend and thought it was a good idea to use em up.
I went through a lot of recipe videos such as Vahchef, Showmethecurry and Sanjeev Kapoor or another one on Sanjeev Kapoor's site. All have different approaches and claim to be very easy. One roasts ghee and nuts in the beginning and add milk and carrots to it. Others do the milk and carrots first and then add the roasted nuts and ghee to it. Some pressure cook and some microwave. Some use khoya, some use curdled milk and some use condensed milk. I was a bit confused after watching them all that I finally mixed em all up into a new approach. I don't have a microwave and I don't want to risk doing it in a pressure cooker, so I did the traditional open pot method. It wasn't so tasking as they said it was, in fact quite enjoyable mixing the carrots and milk regularly and loving the aroma of the steam from the evaporating milk. I wanted to use sweetened condensed milk as I had an open can, so I did not add any extra sugar, the sweetness was just right. I also thought that if I used nuts in the beginning, they can soften up with the milk and carrots cooking with it and you'll miss the nice crunch. So I did it both ways. Here's how:

Ingredients:

Carrots - 1 kilo (about 10 carrots, peeled and grated)
Milk - 400 ml (half the amount of carrots)
Condensed milk - 400 ml
Chopped almonds - few
Chopped cashews - few
Raisins - few
Cardamom powder - 1 tsp
Ghee - 4 tbsp.

Method:

Grate the carrots and set them aside. I used about a kilo of carrots which came to around 2 cups of grated carrots. In a heavy bottomed pan, (use a vessel with a large diameter to help the milk evaporate quicker) add 2 tbsp ghee. When the ghee melts, add half the chopped cashews, almonds and raisins. Roast them until they start browning. Now add the grated carrots, little by little (if you add all at once, you might find it difficult to stir). Add the milk to the carrots immediately and keep stirring to prevent the carrots from sticking to the bottom or sides of the pan. Once all the carrots have been added, keep stirring at regular intervals to prevent the carrots from sticking to the pan. Allow the milk to boil. Simmer and continue stirring allowing the milk to evaporate and reduce. You can notice that the volume of the carrots also reduce as it oozes out its water content. Increase the stirring intervals when the milk is almost completely absorbed. Now add the condensed milk and stirring again. I found that it reduced faster than the milk. Once all the condensed milk has reduced, take it off the stove. Add a teaspoon of cardamom powder and mix. In another pan, add 2 tablespoons of ghee and roast the remaining nuts and raisins. Add them to the halwa and serve. (for more colour, one can also use red/orange food color, but it looks good anyway!)

Banana Custard

banana-custard

Simple dessert, takes hardly 10 minutes to make it and really no effort at all. All you gotta do is prepare the custard, put in the vanilla essence, banana slices and garnish with chopped nuts! How easier can it get. You could add more fruits of your choice, like apples, pears, grapes, oranges, peaches, even those canned pineapple slices will go well with it. I would have loved to use a canned fruit cocktail but did not find it at any of the local stores here, not even spar or thoms.
Excellent last minute dessert and a good way to use that ripening banana that you don't wanna eat or waste. :)

Ingredients:

• 2 Ripe Banana (or 1 as you wish)
• 15 gms Custard Powder
• 1/4 cup Sugar
• 150 ml Milk
• 1 tsp Almonds (chopped)
• 1 tsp Cashew Nuts (chopped)
• Few drops Vanilla Extract

Method:

Peel off bananas and cut into small cubes. 
Mix custard powder and sugar in little milk. 
Boil the remaining milk for 10 minutes. 
Pour the boiled milk into the above mixture. 
Bring the mixture to boil. 
Add banana cubes and vanilla extract. 
Garnish with chopped almonds and cashews. I also used pistachio flakes.
Banana Custard is ready to serve.
banana-custard-closeup

BBC - Bailey's Banana Colada

bbc

This is a Pina Colada with a twist!

If you want to make a virgin one, just omit the alcoholic ingredients.

Ingredients:

Banana robusta - 1
Bailey's Irish Cream - 30 ml (I used the new hazelnut flavour, but you can also use the original version or the caramel one)
White Rum - 30 ml
Pineapple Juice - 60 ml
Coconut Cream/Milk - 60 ml
Amaretto - 10 ml (optional)
Crushed Ice

Method:

Blend all ingredients in a blender and serve!
Cheers!!

Bhindi Masala - North Indian style Okra stir fry

bhindi-masala
I was working at home again and I had to cook up something really fast for lunch. There was a packet of ladyfingers and I've already mentioned in my previous post that I'm not really a fan of this vegetable. But I didn't want it to go to waste and I was bored with the ularthiyathu recipe and wanted to change it a bit. So I searched and found another blog called Whatz Cooking. Not so fancy but the bhindi masala looked good and different.

Ingredients:

250 gms Bhindi (Lady Finger)
3-4 Onions
4 Tomatoes (puree)
1 Tsp Ginger-Garlic paste
1 Tsp Dhania Powder (Coriander Powder)
1 Tsp Red Chilli Powder
1 Tsp Kasuri Methi
1 Tsp Garam Masala Powder
5-6 Tbsp Oil
Chopped Coriander leaves (for garnishing)
Salt to taste
Method:

In a pan, take 2-3 tbsp Oil and fry the lady finger. Remove them from the pan and set aside.
In the same pan, add more 2-3 tbsp oil and fry onions.
Once the onions become soft, add ginger-garlic paste and sauté.
Add dhania powder, red chilli powder and sauté again.
Add tomato puree and salt and cook till the masala leaves the edges of the pan.
Add the fried bhindi to the masala. Cover and cook for 2-3 minutes.
Once the bhindi is cooked, add crushed kasuri methi and garam masala powder.
While serving, garnish with corrainder leaves.

Monday, July 25, 2011

Chicken Tikka Masala

ChickenTikkaDish
I've been in love with kababs since the time I remember. Its quite a pity that I don't have a mircowave oven/grill with me in my kitchen (no space in the tiny kitchen and I havent saved up for it either). But I couldn't stay away from kababs for too long, so I decided to pan fry them instead.
This recipe is mostly from Sanjeev Kapoor's recipe but I've made a couple of changes here and there.
The original recipe does not call for coriander powder or kasuri methi in the chicken marinade. I also added a teeny bit of orange food color because I had it with me but this is only optional. I also added capsicum to the dish. The recipe asks for mustard oil in the marinade but I used regular vegetable oil. Also I did not use any skewers.

Ingredients:

For Chicken Tikka:
Boneless chicken, 1 1/2 inch pieces - 500 grams
Capsicum(green/red) - 1
Kashmiri red chilli powder - 3 teaspoons
Lemon juice - 2 tablespoons
Salt to taste
Oil for frying - 4 tablespoons
For marinade:
Thick Yoghurt - 1 cup
Ginger paste - 1 tablespoon + 2 teaspoons
Garlic paste - 1 tablespoon + 2 teaspoons
Coriander Powder - 1 teaspoon
Garam masala powder - 1 1/2 teaspoons
Kasuri Methi - a pinch (optional)
Vegetable oil - 2 tablespoons
Orange/Red food colour - a pinch (optional)

For Onion Tomato Masala:
Onions, chopped - 3 medium
Tomatoes, chopped - 4 medium
Cumin seeds/Jeera - 1/2 teaspoon
Garlic - 7-8 cloves
Roasted cumin powder - 1/2 teaspoon
Coriander powder - 1 1/2 teaspoons

For gravy:
Butter - 2 tablespoons
Tomato puree - 1/4 cup
Onion tomato masala - 1 cup
Fresh coriander leaves, chopped - 2 tablespoons
Dry fenugreek leaves (kasuri methi), roasted and crushed - 1 teaspoon (optional)
Cream - 1/4 cup (optional)
Ginger, cut into thin strips 1 inch piece (for garnish, optional)

Method:

Mix one tablespoon lemon juice, salt and one teaspoon Kashmiri red chilli powder. Add chicken pieces and marinate for about thirty minutes.
Mix thick yoghurt, one tablespoon ginger paste, one tablespoon garlic paste, one teaspoon Kashmiri red chilli powder, one and half teaspoon garam masala powder, one teaspoon coriander porwder, kasuri methi, food colouring, remaining lemon juice and salt. Add chicken pieces and 2 tablespoons vegetable oil and mix well. Let the chicken marinate for three hours at least or overnight in the refrigerator. The lemon juice and yoghurt act as a meat tenderizer and the other ingredients get absorbed into the meat for a more flavourful and tender tikka. Chop the capsicum into bite size pieces and add them to the mix after getting it the marinated chicken out of the refrigerator. Thread the chicken onto skewers (optional). Heat four tablespoons oil on a tawa and place the skewers on it or fry the chicken pieces and capsicum on it. Cook, turning the skewers or chicken pieces a few times, so that the chicken gets cooked evenly brown from all sides. Take the pieces off the skewers and place on a plate. This can be served as it is if you dont want the masala and just the chicken tikka.
ChickenTikka
For onion-tomato masala heat oil in a pan. Add cumin seeds and when they begin to change colour add onions and sauté till well browned. Add garlic and sauté till lightly browned. Add one teaspoon ginger paste, one teaspoon garlic paste and continue sautéing. Add cumin powder, coriander powder and mix well. Add a little water so prevent the masala from getting burnt or else it will taste bitter. Add tomatoes and continue to sauté on low heat till the tomatoes are completely cooked and the oil surfaces. Add salt and mix. Set this masala aside. Heat butter in another pan and add a teaspoon ginger paste, a teaspoon garlic paste, tomato puree and sauté for two minutes. Add half a cup of water and cook for two to three minutes. Add the chicken pieces, onion-tomato masala and simmer till the gravy reduces a little. Adjust salt and add the remaining Kashmiri red chilli powder (optional, I did not do this), remaining garam masala powder, half the coriander leaves and mix. Cook for two minutes. Add kasuri methi and cream and mix well (I did not do this step either). Remove from heat and serve hot garnished with ginger strips and the remaining coriander leaves.
ChickenTikkaMasala

Serve with Roti, Naan or Jeera Rice. I served it with Sanjeev Kapoor's Jeera Rice and some Coriander-Mint Chutney mixed with yoghurt. Photos have been updated in these previous posts.
Also if you have some leftover the next day, you can use it in a buttered bread, with some green chutney and a slice of cheese. Top it with another buttered slice to make a sandwich. Grill the outer sides of the sandwich on a pan with some butter. Far better than the chicken tikka sandwiches that you eat in cafes outside.

Jeera Rice - Cumin Rice

JeeraRice2

I have already posted a jeera rice recipe before along with the Shahi Paneer.
But this time I tried Sanjeev Kapoor's recipe and added a few extra ingredients from the old recipe as well. Sanjeev Kapoor's recipe involves cooking the rice along with the jeera and allowing the water to reduce completely at exactly the same time the rice is cooked. So the quantity of rice and water is important. The previous recipe involves cooking rice separately and draining it. Then the jeera (cumin seeds), onions, nuts, etc are fried and the rice is added to it. Both ways work great.

Ingredients:

Basmati rice - 1 1/2 cups (I use Saffola Arise - Everyday)
Cumin seeds - 2 teaspoons
Ghee - 1 1/2 tablespoons
Bay leaf - 1
Black cardamom - 1
Cinnamon - 2 two inch stick
Onion, sliced finely - 1 medium
Green Chilly - 1 long, slit
Salt to taste
Cashewnuts - few
Nuts

Method:

Wash rice thoroughly and soak in water for half an hour. Drain. Heat ghee in a pan. Add cashews and toast them till they turn brown. Keep it aside. In the same pan, into the remaining ghee, add cumin seeds, bay leaf, black cardamom and cinnamon. When cumin seeds crackle, add the green chilly and sliced onion. Fry till the onion turns brown and then add rice. Add salt to taste. Stir till ghee coats every grain of rice and it looks glossy. Add three cups of water. Bring to a boil. Stir once. Reduce heat to minimum and cover the pan with a lid. Leave a little gap, otherwise water will boil over. Rice will be done when holes appear on the surface and water has been completely absorbed. Fork the rice out onto a serving dish. This will separate each grain. Serve hot with any curry.
 
JeeraRiceCloseup2

Jeera Rice served with Chicken Tikka Masala:
ChickenTikkaDish2

Tuesday, July 12, 2011

Midnight Masala Art

An image painstakingly created by me using Adobe Photoshop.
As luck may have it, I did not have to work at all today as the servers were down. So I got ample time to doodle and its been quite a while since I've been itching to do some artwork. Today was my lucky day and what satisfaction!!
It involved a bit of image searching on google to get a cute cityscape at night with a happy moon, and another image of a lady happily cooking a healthy meal in a kitchen, and another one of a boiling pot with chicken legs in it. I had to of course do the merging in photoshop. All images had a watermark in front of it which I had to painstakingly remove (ha! those image sites actually think I would pay $20 for an image???) using various tricks. Then resizing the image to fit into a kitchen window, rotating, merging into background work was all done by me. I added the text on the empty billboard. Finally I drew those lovely wafts of smell of the wonderful masala emanating from my kitchen into the night.
Come to think of it I actually do cook in front of a window as my kitchen counter also faces the window. How lovely!

Midnight-Masala

Monday, July 11, 2011

Chemmeen Vada - Minced Shrimp Fritters

Prawnvada1

Credit: Mishmash

Ingredients:

250 gms small shrimp peeled, deveined and washed thoroughly.
4-5 small red pearl onions/shallots
3/4 tbsp finely chopped ginger
7-9 fresh green chillies
A small sprig of curry leaves coarsely chopped
1/4 tsp turmeric powder
Salt to taste
Oil for deep frying

Method:

Using a small jar of the food processor or blender, make a coarse paste of the small onions, green chillies, ginger and curry leaves. To this, add the cleaned shrimp and run the processor till everything combines well, forming a coarse paste and add turmeric powder and salt to taste. Do not make them too smooth as you do for chutney and other condiments.
Make around 10-12 small balls with this mixture and flatten them into a round shape. For flattening, keep the ball of mixture onto your left palm and press it with your right palm. You can do this either on a plastic wrap sheet or a plantain leaf as well, whichever is convenient.
Heat oil in a small saucepan, deep fry each of them, in low-medium heat, until it is cooked or reaches brown colour. Serve warm with a hot cup of tea/chai.

My note: I only got 6 vadas out of shrimps from a 250g packet. It was good anyway. Tasted like a vada, but not that much of a prawn taste. I felt you could fool a vegetarian with it!

Prawnvada2

Coconut Burfi

I love watching food on television. Its just comfort. You don't have anything interesting to watch, put on some channel that has food as its topic. I think you invariably end up learning a lot of techniques, methods, ingredients, variety of cuisines, even photography/videography tips. The history channel used to be a terribly boring channel for me, as I hated history in school. I guess they realized that history aint that appealing a topic to the public masses that they finally decided to revamp the channel as Fox History and Entertainment. Although it was not bad, it wasnt great either. The entertainment value isn't really there when you have tons of entertainment channels already. So they changed its name again to Fox History and Travel. Now that's more like it! Discovery's Travel & Living channel was pretty much dominating over the whole travel genre of television. Now this channel seems to be giving Discovery's TLC a run for its money with innovative Traveller shows. Bizarre things to be found very much in India, in a program called 'It Happens Only in India' is an interesting watch and I think it could be showcased to tourists on flights to India. Then there's the strange 'What's with Indian Men': two women travelling all over India to focus on different kinds of Indian Men. And when it comes to food, there's David Rocco's Dolce Vita and Food Safari that stands out. Food Safari seems to be quite an interesting one which is literally a safari to various exotic parts of the world, food is prepared in a typical native's house which makes it very easy to relate to and understand. I got this easy coconut and cardamom burfi recipe from Food Safari! :)

Cocoburfi1

Credit: Food Safari on Fox History & Travel

Ingredients:


250g desiccated coconut
395g can sweetened condensed milk
10 cardamom pods - grind/crush seeds into a powder
Handful of pistachio nuts, roughly crushed

Cocoburfi2

Method:

Mix 200g of the coconut and the remaining ingredients in a bowl.

Heat a non-stick pan on low heat and add mixture to the pan. Stir over low heat until the mixture starts to dry and rolls easily into a ball. Remove from the heat. Cool for 5 to 10 minutes until cool enough to handle.

Place the remaining coconut onto a plate. Using damp hands, roll the mixture into balls and then roll in coconut to coat. The coconut balls can be refrigerated for up to a week.

My notes: Use a few drops of oil to rub your palms before rolling the mixture into balls. This is help prevent the mixture to stick to your hands. I used canola oil, you can use any oil thats mild without a strong smell.

By the way I'd like to say Hi! to my new follower Preeti (Alexey's Friend) who is apparently just my 4th follower so far lol! I'm sure you must've eaten better burfis prepared at your place but this one's for you! :)
PS: Thanks for trying the fluffy omelette! Yummy right?

Cocoburfi3

Kothavarangai Poriyal - Cluster beans stir-fry

I'm not exactly familiar with cluster beans mostly because it wasnt cooked in my home. Don't know about its use in kerala but it seems to be a regular side dish in Tamil Nadu and Andhra Pradesh. I bought these last weekend for a change in variety of beans as I only bought french beans. Apparently I liked this particular dish whenever I ordered meals in the popular Andhra restaurant Nandhini. I decided to give this recipe a try at home and it was definitely good!

clusterbeans

Credit: http://www.rakskitchen.net/2009/04/cluster-beans-poriyal.html

Ingredients:

Cluster Beans,Chopped 1 1/2 cup
Moong dal/Paasi paruppu 2-3 tblsp
Sambhar powder/red chilli powder 1 tsp
Turmeric powder 1/8 tsp
Coconut gratings 1/4 cup
Onion 1 no.
Salt As needed

To Temper:
Mustard 1 tsp
Urad dal/ulutham paruppu 1 tsp
Curry leaves  A sprig
Oil 1 tsp

Method:


1.Remove the head and tail of cluster beans,wash them and chop them finely as shown in the picture.
2.Boil the cluster beans in water,along with moong dhal,turmeric,salt,sambhar/red chilli powder.
3.Cook till done,moong dal should be just done,not too soft....by that time moong dhal gets cooked,cluster beans too should have got cooked just right.
4.Drain the water and keep aside.
5.Heat kadai and temper with the tempering items,followed by onion and fry till onion turns transparent.
6.Add the cooked cluster beans,moong dal and fry for two minutes in medium flame till moisture gets absorbed. .
7.Add the grated coconut and stir well for a minute.
8.Transfer to the serving dish! Serve as accompaniment for rice.

This tastes great when mixed with ghee and hot rice. Thats how I ate it in Nandhini too. Add a fried pappad and you're good to go.